Wednesday 13 December 2017

Sourdough Starter | Make your own Sourdough Starter at home | Bread without commercial yeast | Mother Starter

We are a nation of flatbread lovers.. We can't do without our rotis, Parathas, Chapatis and Puris.. But we also embrace new food trands with open heart. Leavened breads is one such trend.. However, many of the commercial breads that we get at supermarket have chemical additives to make the breads super soft.

So what do we do? Sure, we can bake our own breads.. and that is what I started doing when Zini was ready to eat bread. Still the dependence on commercial yeast has always been nagging in the background. And that is when I discovered sourdough.. With my well known love for fermented food, I was bound to like it :)

I tried making my starter 4 years back. But with a lot of things going around, I couldn't really keep it.

Off late I have been thinking a lot about baking sourdough for my family.

And when I got my Carpal tunnel surgery done and was forced to stay at home, i decided to get my starter going. I weighed the ingredients with my left hand, I took help from whoever was willing to help (mostly my maid) to discard and mix.. And there it is!! finally ready!! It has now baked countless batches of crackers (of various flavors) and some good loaves, readily devoured by us!!

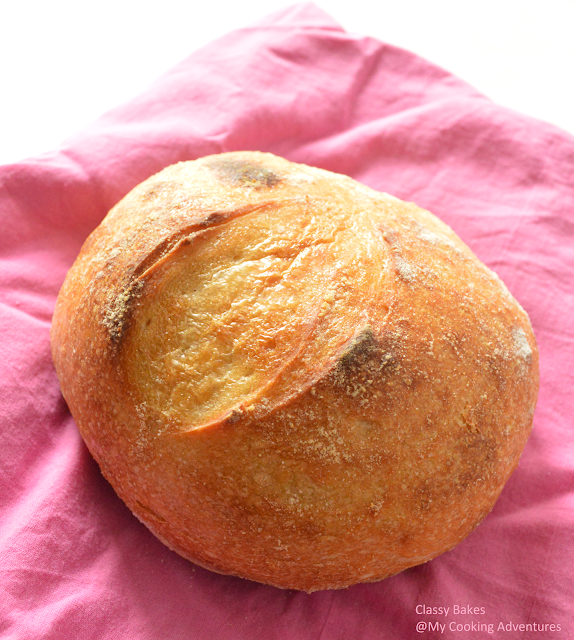
Look at this mother!! Happy and bubbly.. She is still young but strong enough to bake up a boule!!

Sourdough Starter.. Mother Culture!!

Boule organic artisan bread
Boule..  Organic Artisan Bread.

Garlic, Cilantro and herbs sourdough crackers
Garlic, Cilantro and herbs sourdough crackers.. Zini's most favorite thing to dip into her cheesy dip..  

You too can make these goodies at home, so start with your starter!! For this recipe or rather formula, I am not going to do a formal recipe post, rather I will just talk about the journey as that is what is most important!!

This is a 100% hydration starter. This basically mean that for 100 grams of flour you add 100 grams of water.

To make this starter, you need a glass or good quality plastic ( i use glass only, my recommendation glass) big bowl or wide mouthed canister. some spoons and a weighing scale.

You will also need flour and water.

But most important ingredient is Patience and faith!! Sounds spiritual (and it actually is)!!

Once that sorted, let's start with the recipe, shall we?

On Day 1 in a CLEAN jar, take 50 gms of whole wheat flour and 50 gms of All purpose flour. I used organic flour. It helps.. Mix well. Add 100 gms of water to it.. If using jar or canister, cover loosely. don't make it air tight.

On Day 2, you may or may not see some activity in the starter. But chances are that you will see activity if you are in a warmer climate like India. But this are not the critters that we wanted. So discard half of your starter and feed it again with mixture of 50 gms of whole wheat flour and 50 gms of All purpose flour and 100 gms water.

On Day 3, your  starter may slow down. Still worry not. Keep Calm and Discard half of your starter and feed it again with mixture of 50 gms of whole wheat flour and 50 gms of All purpose flour and 100 gms water.

On Day 4, your  starter may still not show any sign of life. Patience, my friend! Stay Patient and Discard half of your starter and feed it again with mixture of 50 gms of whole wheat flour and 50 gms of All purpose flour and 100 gms water. Do the same thing on Day 5 as well.

On Day 6,  my starter smelt like dirty socks.. Panic not. Keep faith.. It's okay! Discard half of your starter and feed it again with mixture of 50 gms of whole wheat flour and 50 gms of All purpose flour and 100 gms water.

At this stage I branched out to a non-organic starter and kept two starters in two separate glass bowls. One organic another non organic.

On Day 7, I took 2 TBSP of my starter in a glass bowl, added 30 gms of organic whole wheat flour and 30 gms of organic all purpose flour (maida) and 60 gms of water and mixed well. Similarly in a separate bowl i took 2 TBSP of my starter and added flours and water in the same quantity but the flours were non organic. This was incidentally the day I got the surgery done.

On Day 8, I came back from the hospital and with the help of my maid, discarded and fed the starters again. On this day, I fed my starters twice as I was late with feeding. So they were fed once at 12.30 pm and once at 8 pm with 30 gms of whole wheat flour and 30 gms of all purpose flour (maida) and 60 gms of water.

On Day 9, I went back to feeding them once a day with 30 gms of whole wheat flour and 30 gms of all purpose flour (maida) and 60 gms of water and continued this routine till day 12. On this day I baked Sourdough crackers from the discard. But continued with my feeding schedule till day 14. On this day, my starter smelt pleasant. Finally baked a boule on Day 14.

My Starter was ready finally!! So what happened? how did we manage to catch the yeast? The answer is that it was always there!! since the beginning, it came from the organic whole wheat flour. But it was not dominant till the starter became acidic enough for it to thrive and for other unwanted critter to exit! And thrive it does, just a matter of little patience and faith..

Will be sharing the recipes for crackers and boules in the coming posts..


But before I end, will share some notes..

1) Always use clean equipments. Keep your hands clean too.
2) Be regular with your feedings. Don't miss them.
3) Always mix vigorously before discarding. Then feed the starter and once again mix vigorously. The yeast likes oxygen!
4) If you see liquid on top, then your starter is hungry. Discard most of the starter, keep a little and feed it.
5) Most important!! Keep faith!

I should also warn you that you will be wasting a lot of flour in the process. But you can always use discard for bird feed or cat feed or for making maure if you keep garden.

So if you decided to do it, all the best!!

In my quest for sourdough starter, a lot of people helped me.. I am so thankful to all of them. The folks at Indian Artisan Bread Baker and Chef Nagpal have been very helpful throughout and holding my hands through the process!!

And a special mention for Teresa L Greenway whose online sourdough course on Udemy is as good as it gets. Till the time I took up her class, I was skeptical about online classes, but the way she explains and answers all the questions as soon as you get them is commendable!! Amazing course!! Thanks again..

And of course a big thanks to my family and my maid for keeping and feeding the starter despite their urge to throw away the old smelly goop ;) and keeping up with my seemingly crazy obsession..

Organic Sourdough Boule made from sourdough starter
Organic Sourdough Boule made from my sourdough starter


Monday 11 December 2017

Feeling Proud | Classy Bakes | Home Baker

I mentioned earlier that I have re started baking professionally.. I take order for cakes, cookies and my personal favorite breads..

But as I started work, the first thing this time was to design a logo... And I am so proud that I was able to design it myself.. It may not be very swanky, but is close to my heart and has everything that I thought it should have. It is also very special to me as Zini too contributed to it. I was stck on the design and was feeling that something was missing and then Zini gave this idea of putting everything in a pink circle with the wavy lines.. I added one more for luck and what do you know?! I had my logo!! In case you are curious about the work that I do, you can check out Classy Bakes' (that's my business' name) Facebook and Instagram pages and follow and like them, to keep track of my work...
Classy Bakes Logo
Logo for my business.. Designed and Created by me!!
And then there was no stopping!! I baked and decorated cakes, cookies, cupcakes and breads.. Loved doing them all.. Here are some of my bakes.. And I am so proud of them :)

Channel Purse Cake
Channel Purse!! Nope, it's purse cake, made by yours truly.. Psst. everything is edible! Yes! the zip, the buckle and the flap too..

Fidget Spinner Cookie.. it actually spins.. You can play with your food before eating
it ;)

Fidget Spinner Cake.. Give it a spin before cutting it.. Now available at Classy Bakes..

Mango Tree Cake
The cake done by me in my final test.. Those mangoes and those leaves kept me up at night!! And keeping the tree upright and balanced was a structural nightmare, but the engineer in me rose to the occasion and pulled it off..

Princess Cake
Princess Themed 3 Tier Cake..
Rose Rolls
Assorted Breads.. Pizza rolls and Firangi Samosas..
Fashion themed cake
Fashion themed cake for a fashionista.. A chocolate truffle cake. Everything is edible, the girl including...

Father's day cupcakes
Cupcakes to Celebrate Father's day

jungle theme cookies
Jungle Themed Cookies, with all edible decoration. They are really big at 4 inch!!

jungle theme cake pops
Cake Pops. Again jungle theme


karwachouth cupcakes
Karwa Chouth Cupcakes.. With bangles, lipstick, Sindoor, Bindi, Moon and Chunni..

Princess cupcakes with crown, pearls and glitter
Princess themed Cupcakes, with pearls and glitter..
With each passing day, I am trying to learn and implement new things. Will keep this place updated, with my learnings..


+te


Thursday 23 November 2017

French Macarons | Macarons | French Baking | Classy Bakes

So what all I have been doing when I was not blogging? If you saw my previous post, you know I now work full time and as a result indulge in some 4 hours long commute daily which i totally hate...
But what else has been cooking (or baking?) A lot... Cakes, breads, cookies and MACARONS!! Yes, finally got successful in baking these prettiest and classiest and tastiest cookies (if you can say so.) ever.

I had received a book called Macaron Fetish by Kim H Lim-Chodkowski published by Skyhorse publishing along with the other book called French Baker. Thank you Amanda Tufaro for choosing me..

This book is so amazingly beautiful!! full of most beautiful Mac pics and at the same time a complete troubleshooting guide and with considerable pages dedicated to detailed Q&A, not to mention, lot of in detail recipes. It follows the french method of baking macarons..

I had received this book long time back and had been brave enough at that time to try out the recipe without (HOLD YOUR BREATH).. weighing scale!! Yes, totally naive. i know.. So we won't count it as my first trial ;).

But here is my latest trial of baking macarons and a successfull one i must say... look at those lovely feet.. look at that cute bite size. .

Check them out and tell me what do you think?!! And if you are feeling brave enough and want to make it then here is the recipe..


Ingredients:

For the Shell:

Egg white 40 gms
30 gms superfine sugar
30 gms almond meal
50 gms powdered sugar
Food colouring  (optional)

For the filling:
Chocolate
Cream

Method:

1) Weigh the egg whites and beat them in a steel bowl. Beat them to medium peaks.
2) Mix in the superfine sugar. Beat to stiff peaks to get the meringue.
3) Sift Almond meal and powdered sugar together.
4) Little by little mix and fold the almond mixture to the egg mixture.
5) Fold till the batter becomes smooth and flows like molten lava.
6) Fill in the piping bag and pipe on the circles on the parchment.
7) Let the macarons dry till they form a skin.
8) Bake in a pre heated oven at 150 degree c for 8 minutes.
9) let them cool down completely before touching.
10) Once cool, fill them with the filling of your choice. I filled them with chocolate ganache (mad e by mixing melted chocolate and warm cream , as much as you like)

Notes:
1) It's important to let the macs cool down properly.
2) you can fill them with whatever you like. there are many possible options like preservers, jams, buttercream, ganache etc..

 +techie ZM


Wednesday 26 April 2017

Thank you..

Breaks and comebacks are a recurring theme on this blog.. I do take a break and disappear without any trace and then suddenly come back. This is a pattern that needs to be broken. Hopefully this time.
So any of you who are still around and are interested.. Since I disappeared, I have started working full time. I thought of sharing this information and continue with my both the blogs once I started the job and everything settled down. How naive I was… Once I started the job, the long commute (as long as it could be) didn’t leave time for anything else. Zini who was initially excited that mummy has started office, started missing me. Thankfully I have great support system at home, with hubby taking care of Zini’s study and my mom, masi and mother in law in turns coming here and staying with us to be with Zini when her parents are at work. Touchwood…
With the job started long metro commutes where I would go into semi zombie state. This also took a toll on my health. But I was thankful that I got a job after a long break of 4 years.. I was happy to get a start.  I thought that may be after a year or two I will shift somewhere nearby with more time on my hand. However I didn’t change the job. With a diverse profile (Just a kinder word for changed profile at an average of 2 years) it got difficult to get a suitable well paying job and I continue working where I was working. I thought that may be travelling by car will reduce fatigue and I got a car. Still it was the same. I saved maybe 10-15 minutes of commuting time in the evening.
I can write about my experiences at work after being back to the corporate world after such a long time. I can write about my travel experiences. But today I just want to thank you guys.. For being so forgiving, for inquiring after me and for thinking about me…
A recent encounter with a fellow blogger on a facebook group made me want to come back, connect and thank all of you..
Hope to write many more blog posts over the years. Wish me luck..

Friday 19 September 2014

Kala Chana nu shaak | Desi Chana | Black Chickpea recipe | Healthy Protein packed vegan meal | Dry Kala Chana

This Gujarati kala chana nu shaak is one of my favorites!! It is so easy, so healthy yet so tasty!! I enjoy making it and I love eating it!! It can give you a healthy dose of protein.. The combination of this kala chana curry the way my mom makes it with kadhi and bhakhri is simple yet deliciously filling!

It tastes good on it's own too. This is just a little different than Kondakadlai Sundal (Chana Sundal)..
The day your fridge is empty or your energy level is low, make this simple gluten free & vegan curry and see your mood soar!! Just don't forget to soak it overnight :)

In north India this simple chana are made on the 8th day of Navratri festival (Kanjak) and offered to young girls, considered as Goddesses, along with halwa & puris!! Delicious!! My little girl and her papa loves it with Puri (puffed Indian bread) and that is how it is often eaten at my place!!
Sometimes I make a healthy chane ki chaat by adding finely cut onions, tomatoes, chaat masala and green chutney to it!

Kala Chana | Deshi Chana | Black Chickpea curry | Healthy protein packed vegan meal

Kala Chana | Deshi Chana | Black Chickpea curry | Healthy protein packed gluten free meal
Ingredients:

1 Cup Kala chana / Deshi Chana / Black Chickpeas soaked for at least 8 hours.
Salt to taste
1/ teaspoon Green Chilli and ginger paste (Adjust according to taste)
1.5 teaspoon dhania jeera powder (Cumin coriander seeds powder)
1/2 wedge of lemon (Optional - but I love adding it)
2 tablespoon oil
1/4 teaspoon mustard seeds / rai/ sarson
pinch of hing

Method:

1) Pressure cook Chana (chick peas) with salt till tender. It's really important to cook it properly. To check if it is properly cooked, take a cooked chana and squeeze it between your thumb and a finger. It should squeeze easily. If it doesn't then you should cook it further.
2) In a kadai (pan/wok) heat 2 tablespoon of oil and add mustard seeds (rai) to it.
3) Once rai (mustard seeds) crackle, add a pinch of hing to it.
4) To this immediately add properly cooked chana without water.
5) Add green chilli and ginger paste and dhania jeera powder and mix well.
6) Let it cook for 5-10 minutes, or till no water is visible.

Squeeze lemon juice before serving.

Kala Chana | Deshi Chana | Black Chickpea curry | Healthy protein packed vegan meal


+techie ZM

Tuesday 9 September 2014

Vegetable Cheese Roti roll | Quick meal | Vegetable cheese tortillas | Peanut butter rolls | Lunch box recipe

What do you do when you are crazy hungry but have almost no time to whip up something? What happens when you have to have your breakfast on the go? Add to this the fact that you want to eat healthy yet craving for something yummy! For those of you who have such questions (just like me), I have found an answer!!

The quickest, healthiest roll that can act as breakfast, lunch, snack or even light dinner!! Oh and not to mention tastiest!! You can pack it in the lunch box of your little one and rest assured that it will come back empty!!

These rolls are complete food with cereal, dairy protein and veggeis! Add to it goodness of peanut butter, freshness of herby green chutney or tanginess of tomato ketchup and you have got a winning combination on your hand. 

The great part about these rolls is that they are amazingly flexible. You can make them with rotis (Indian flatbread) or use ready made tortillas. You can make a vegan version of it by replacing cheese with tofu!! If you have nut allergy then use regular butter or other vegan butter!!

Check out the beauties.. 
Vegetable Cheese Rolls | Quick meal | Peanut butter rolls | Lunch box recipe
Ingredients (for one roll):

1 roti /  1 tortilla ( If you want to make it gluten free, use glutenfree tortilla)
1/2 teaspoon peanut butter/ regular butter ( I use FebIndia's crunchy peanut butter without added sugar)
2 pinches of salt
2 pinches of black pepper
1 tablespoon green chutney or tomato ketchup
2 tablespoon grated cheese of your choice (Cheddar, cottage cheese/paneer, ricotta will go great) use tofu for a vegan version.
1/2 small finely cut onion
1/2 small finely cut tomato
1/8 cup finely cut or shredded vegetable of your choice (Cucumber, carrots, Zuchhini, bell peppers/Capsicum, Broccoli can be good choices)

Method:
1) On your work surface put your roti/ tortilla.
2) Spread peanut butter on that.
3) In a bowl mix all other ingredients.
4) Spread them on top of the roti.
5) Roll and cut if needed. If planning to carry as an on the go meal, pack it in a cling wrap or foil.

And you are good to go!!
Vegetable Cheese Rolls | Quick meal | Peanut butter rolls | Lunch box recipe


Vegetable Cheese Rolls | Quick meal | Peanut butter rolls | Lunch box recipe

Thursday 4 September 2014

Bhindi ki Sabzi | Punjabi Sabji | Stir Fried Okra curry | Ladies finger curry | Cutting and cleaning bhindi

Bhindi AKA Okra is the most favorite curry at home! My love for this green veggie is the talk of our family (& my work places). At my first job, everyday someone or the other would bring bhindi. It was a big office and I virtually knew everybody and everybody knew me!! So every day at lunch hour I would get a call telling me that there is bhindi, "Aavi jao" (Come over)!! My grandma too fanned my love for bhindi by making it everyday during my vacations!!

Thankfully hubby too has a great liking for it. So needless to say, our offspring too takes after us on this matter!! The result - Bhindi every week in the season!! Though the bhinda nu shaak that I grew up on was a little different than the version my hubby grew up on. I make both versions and like them both, when it comes to bhindi I don't discriminate ;) . The one I am sharing today is Punjabi version as my MIL makes it.. It is vegan, gluten free and paleo! Simple, quick and yummy!! Check it out..

Punjabi Bhindi Curry | Okra Stir Fry

Ingredients:

500 gms Bhindi/ okra/ ladies finger, washed, wiped and cut into half inch length
1 big or 2 medium sized onions, peeled and cut into long slices
Salt to taste
1/4 teaspoon turmeric powder
1/4 teaspoon red chili powder (you can adjust according to your taste, we don't eat too spicy/hot food)
1 teaspoon dhania powder/ coriander seeds powder (I use dhania jeera powder/ coriander cumin seeds powder as I normally have this in stock) 
2 tablespoon oil

Method:
1) Heat oil in a thick bottomed kadai (wok/pan).
2) Now add onions to it, let them turn translucent. Keep stirring.
3) Once they turn translucent, add cut bhindi/okra to the kadai (wok).
4) Mix well. Let it cook uncovered for 10 minutes.
5) Now add turmeric and salt. mix well and cover. If your kadai/wok/pan is not thick bottomed, keep a tawa/ skillet under it.
6) Let it cook covered for 15 more minutes. Keep stirring in between.
7) Once the bhindi cooks, add dhania jeera powder (coriander cumin seeds powder) and red chili powder.
8) Mix well and cook for 5 more minutes.

I love bhindi with kadhi or dal. Though along with curd and roti they fulfilling and healthy meal.

Notes:

1) It's very important to wipe the okra/bhindi. If you skip this step, it will be slimey and not so appetizing. If planning to make it in the morning then you can wash bhindi at night and cover it with a dry kitchen towel. Next day spread them on another dry towel under fan. They will dry out fast and then you can skip wiping them!
2) While cutting okra/bhindi check for mature (pakat/ gharda) bhindi. You should discard them as they won't get cooked. They are generally big and difficult to cut. To verify further, try to snap it in two by bending it. If it doesn't snap then it is indeed mature and needs to be discarded.
3) Remove the dincha (top) of the bhindi as it won't cook.

Punjabi Bhindi Curry | Okra Stir Fry

Punjabi Bhindi Curry | Okra Stir Fry


Thursday 3 July 2014

Chocolate, Peanut butter and dates milkshake - Ramadan Recipe - Guest post for Huma..

Huma of Gheza-e-Shiriin wanted me to do a guest post for her Ramdan series. She has an amazing collection of veg and non-veg recipes! Her pictures are lovely! However the best part about her is her warm and friendly nature!! Apart from blogging and food photography, we also talked at length about her work (she is an entrepreneur and I am impressed), her family (hails from Baroda), her 2 states (yet arranged) marraige!! I am happy to have her as a friend :)

When Huma said Ramdan, the first people to come to my mind were J Uncle, my papa's friend and his Amma!! Though I never got a chance to meet Amma, I've heard a lot of fond stories of my papa's childhood revolving around her. He would very fondly talk about how Amma would lovingly feed him and my kaka, the heavenly sheer khurma prepared by her during Ramdan and the non-veg food at her place!! Even after J uncle and his family shifted to a new place, the first thing my papa do on Eid morning every year is to call him and wish him Eid Mubarak and talk about the lovely old days!! This tradition continues till date!! May this friendship remain intact forever..

During my first job, I got a chance to see old city of Ahmedabad during Ramadan months!! Ramdan evening in old city are filled with vendor selling all kind of foods, kebabs, tikkas, bakery style cookies, dates etc.. Air is filled with festivity and people doing shopping!! Something that makes old city all the more endearing..

I thought a lot about what to make for Huma's Ramdan series. Originally I wanted to do a Sheer Khurma recipe to honour Amma but Huma already had published the recipe. So I got thinking again. I wanted to make something that would be filling enough, something that is delicious, something that would be appreciated in today's busy times yet has it's roots in tradition!! Finally I zeroed in on this milkshake. Perfect for consumption during Suhoor and Iftar meals!!

Otherwise perfect too :)!! Check out this easy peasy recipe @ her place..


+techie ZM 

Tuesday 13 May 2014

Mango Chutney | Kache Aam ki Chutney | Aam ki khatti mithi chutney

Summer is here, so are mangoes!! I am a ripe mango freak, give me keri no ras, mango shake, smoothie or even simply cut (or even whole) ripe mango and I am happiest!! I am not much into kaccha aam, but if you convert that raw mango to preserves like, Pickle, Chundo, Murabbo or this chutney then I'll happily lap it up!! This is more like Indian mango jam :)

This chutney is so similar to the quick version of chundo!! And it not only tastes delicious, it also helps in surviving the deadly Indian summer with goodness of onions and raw mango!! It's easy and quick to make and loved by all!! It goes well with rotis, parathas, bhakhari, puri & breads!!

So grab those raw mangoes and get making my MIL's version of raw mango chutney!! Naturally vegan, gluten free!!


Mango Chutney | Kachhe Aam ki Chutney
Ingredients:

3 raw Mangoes / kachhe aam (medium size) - peeled and grated
1 small onion - finely cut or grated
1/2 teaspoon grated ginger
1/4 cup sugar
1/4 teaspoon red chili powder
pinch of asafoetida (hing)
1/2 teaspoon salt (or to taste)

Method:

1) In a heavy bottomed pan , take grated raw mangoes, onion and ginger. Mix well.
2) Let it cook till all the water evaporates. Keep stirring in between.
3) Now add sugar and mix well. Cook till all the water from sugar too evaporates, add red chili powder and salt. Mix well.

The mango chutney is ready. Let it cool down and then store in a GLASS (and not in anything else) jar in the fridge!!

Mango Chutney | Kachhe Aam ki Chutney


+techie ZM

Thursday 8 May 2014

Dal Tikki | How to make moong daal tikki | Leftover Green grams recipe | Indian pancakes

What happens when you have left over moong dal from the night and in no mood to make parathas for breakfast?! You google and zero in on a dal tikki recipe!! But what happens when you have a peanut sized memory?! You can't remember the recipe when you finally get making it (except for the fact that it had moong dal and may be besan in it) and then you come up with something that will be made in house forever as you and your family loved it!!

Yeah, this is what happened to me few months back, but as I was very busy, couldn't share the recipe.. Finally sharing it now!! It is so amazingly crispy and yummy, even the biggest moong dal haters (my hubby) love it!! It gives a protein packed start to your day and is so healthy!! These tikkis are naturally vegan, gluten free and low on oil (& calories too)!!

You can make this from any other leftover dal/sambhar too!! Check your fridge, do you have any leftover? then get making this!!
Oh and in case you don't have leftover and still want to make it then just pressure cook split green gram ( dhuli moong dal - mogar) with salt, turmeric and red chili powder and use it.

Before that have a look at how crispy and yummy and heavenly golden they look like!!


Ingredients:

1 cup leftover moong daal (cooked) - Any other dal will do too, adjust as per available leftover dal!!
2 Tablespoon of besan (Chick pea flour)
1 teaspoon green chili, ginger and garlic paste
2 tablespoon Idli rava (rice semolina) - if you don't have this then use regular semolina/ sooji/ rawa
Salt to taste
1/4 teaspoon turmeric powder
1/4 teaspoon chaat masala (Optional)
pinch of hing (Asafoetida - optional)
1 small onion finely cut
1 small tomato finely cut
Any other veggie that you want to sneak in (it should cook fast)
Oil for shallow frying

Method:

1) Mix everything in a mixing bowl.
2) Heat a non stick tawa/ skillet / griddle. Once it is hot enough grease it with oil.
3) Make small tikki (flat pancake) shapes in your palms and drop them on the tawa.
4) Let it cook thoroughly on one side, once it cooks flip it and cook thoroughly on other side too. You can make 2-3 tikkis (or as much as your tawa/ skillet can take) at a time.

Serve hot with green chutney or tomato ketchup!! This also makes for a great snack, starter or lunch box food!!

If you want to use even less oil then you can make these cuties in pancake popper (paniyaram pan / appa patra/ aebleskiver pan)!! I am happy to report that I've tried that and it too tastes great!!

Dal tikki | Indian pancakes


Tuesday 6 May 2014

Gawar Phali ki Sabzi | Guwar Phali nu shak | Gujarati Shak | Cluster beans curry

Guwar phali is something that I relish with Gujarati dal and Phulka Rotli!! Naturally Guwar phali doesn't have a pleasing flavor, but add to it 2 secret super flavors and the resulting healthy curry is bursting with flavors!! Miss adding them and you have food fit for cows ;)

I had a rather interesting mis adventures with this sabzi during my second job. Two of my colleagues (& friends) and I were sharing a home and kitchen. It was a last day of job for one of our roomie and she decided to surprise us with some cooking. 

She was generally dis interested in cooking and related chores but that day as a gesture of farewell she wanted to cook something for us. So she went ahead and cut the only sabzi we had in stock  - Guwar phali!! She also kneaded the dough!! But there were a few catches.. The dough was too sticky to roll and the she had used up all the flour!! We didn't have garlic and carom seeds  - the 2 secret flavors needed to make the tasty guwar phali curry!! After she realized the mess we were in, she decided to wake us up and share the news!! Needless to say we had one of the worst meal of our lives, but at the same time we had one of the hardest laugh of our lives :) Sometimes bad food too can create good memories ;)

So without further ado, here is the healthy, tasty, quick and vegan curry with 2 secret flavors ;)


Ingredients:

250 gms Cluster beans (Guwar Phali) - stringed and cut inch long
1/2 teaspoon green chili and ginger paste 
4 garlic cloves - peeled and crushed (Lahsun / Lasan)
1/4 teaspoon mustard seeds ( Sarson/rai)
1/4 teaspoon carom seeds (Ajwain)
2 Tablespoon oil
1 teaspoon besan (Chick pea flour)
pinch of hing
1.5 teaspoon dhania jeera powder (Cumin corrinader seeds powder)
1/4 teaspoon turmeric powder (haldi)
1 teaspoon sugar (otpional - but I like it)

Method:

1) Pressure cook Guwar Phali.
2) Now in a kadai (pan), take oil and heat it. Add mustard seeds to it. Once they crackle add carom seeds and hing.
3) Now add besan (chick pea flour) and Pressure cooked Guwar Phali sans water.
4) Add salt, dhania jeera powder, green chili ginger garlic paste and turmeric powder. Mix well.
5) Let it cook till all the water evaporates and masala is coated well to the phali. Add sugar if using..

Serve with daal and roti.. From leftover you can also make guwar dhokli (shaak ma dhokli) something that I am crazy about!!


Sourdough Starter | Make your own Sourdough Starter at home | Bread without commercial yeast | Mother Starter

We are a nation of flatbread lovers.. We can't do without our rotis, Parathas, Chapatis and Puris.. But we also embrace new food trands...