Showing posts with label Punjabi. Show all posts

Friday, 19 September 2014

Kala Chana nu shaak | Desi Chana | Black Chickpea recipe | Healthy Protein packed vegan meal | Dry Kala Chana

This Gujarati kala chana nu shaak is one of my favorites!! It is so easy, so healthy yet so tasty!! I enjoy making it and I love eating it!! It can give you a healthy dose of protein.. The combination of this kala chana curry the way my mom makes it with kadhi and bhakhri is simple yet deliciously filling!

It tastes good on it's own too. This is just a little different than Kondakadlai Sundal (Chana Sundal)..
The day your fridge is empty or your energy level is low, make this simple gluten free & vegan curry and see your mood soar!! Just don't forget to soak it overnight :)

In north India this simple chana are made on the 8th day of Navratri festival (Kanjak) and offered to young girls, considered as Goddesses, along with halwa & puris!! Delicious!! My little girl and her papa loves it with Puri (puffed Indian bread) and that is how it is often eaten at my place!!
Sometimes I make a healthy chane ki chaat by adding finely cut onions, tomatoes, chaat masala and green chutney to it!

Kala Chana | Deshi Chana | Black Chickpea curry | Healthy protein packed vegan meal

Kala Chana | Deshi Chana | Black Chickpea curry | Healthy protein packed gluten free meal
Ingredients:

1 Cup Kala chana / Deshi Chana / Black Chickpeas soaked for at least 8 hours.
Salt to taste
1/ teaspoon Green Chilli and ginger paste (Adjust according to taste)
1.5 teaspoon dhania jeera powder (Cumin coriander seeds powder)
1/2 wedge of lemon (Optional - but I love adding it)
2 tablespoon oil
1/4 teaspoon mustard seeds / rai/ sarson
pinch of hing

Method:

1) Pressure cook Chana (chick peas) with salt till tender. It's really important to cook it properly. To check if it is properly cooked, take a cooked chana and squeeze it between your thumb and a finger. It should squeeze easily. If it doesn't then you should cook it further.
2) In a kadai (pan/wok) heat 2 tablespoon of oil and add mustard seeds (rai) to it.
3) Once rai (mustard seeds) crackle, add a pinch of hing to it.
4) To this immediately add properly cooked chana without water.
5) Add green chilli and ginger paste and dhania jeera powder and mix well.
6) Let it cook for 5-10 minutes, or till no water is visible.

Squeeze lemon juice before serving.

Kala Chana | Deshi Chana | Black Chickpea curry | Healthy protein packed vegan meal


+techie ZM

Thursday, 4 September 2014

Bhindi ki Sabzi | Punjabi Sabji | Stir Fried Okra curry | Ladies finger curry | Cutting and cleaning bhindi

Bhindi AKA Okra is the most favorite curry at home! My love for this green veggie is the talk of our family (& my work places). At my first job, everyday someone or the other would bring bhindi. It was a big office and I virtually knew everybody and everybody knew me!! So every day at lunch hour I would get a call telling me that there is bhindi, "Aavi jao" (Come over)!! My grandma too fanned my love for bhindi by making it everyday during my vacations!!

Thankfully hubby too has a great liking for it. So needless to say, our offspring too takes after us on this matter!! The result - Bhindi every week in the season!! Though the bhinda nu shaak that I grew up on was a little different than the version my hubby grew up on. I make both versions and like them both, when it comes to bhindi I don't discriminate ;) . The one I am sharing today is Punjabi version as my MIL makes it.. It is vegan, gluten free and paleo! Simple, quick and yummy!! Check it out..

Punjabi Bhindi Curry | Okra Stir Fry

Ingredients:

500 gms Bhindi/ okra/ ladies finger, washed, wiped and cut into half inch length
1 big or 2 medium sized onions, peeled and cut into long slices
Salt to taste
1/4 teaspoon turmeric powder
1/4 teaspoon red chili powder (you can adjust according to your taste, we don't eat too spicy/hot food)
1 teaspoon dhania powder/ coriander seeds powder (I use dhania jeera powder/ coriander cumin seeds powder as I normally have this in stock) 
2 tablespoon oil

Method:
1) Heat oil in a thick bottomed kadai (wok/pan).
2) Now add onions to it, let them turn translucent. Keep stirring.
3) Once they turn translucent, add cut bhindi/okra to the kadai (wok).
4) Mix well. Let it cook uncovered for 10 minutes.
5) Now add turmeric and salt. mix well and cover. If your kadai/wok/pan is not thick bottomed, keep a tawa/ skillet under it.
6) Let it cook covered for 15 more minutes. Keep stirring in between.
7) Once the bhindi cooks, add dhania jeera powder (coriander cumin seeds powder) and red chili powder.
8) Mix well and cook for 5 more minutes.

I love bhindi with kadhi or dal. Though along with curd and roti they fulfilling and healthy meal.

Notes:

1) It's very important to wipe the okra/bhindi. If you skip this step, it will be slimey and not so appetizing. If planning to make it in the morning then you can wash bhindi at night and cover it with a dry kitchen towel. Next day spread them on another dry towel under fan. They will dry out fast and then you can skip wiping them!
2) While cutting okra/bhindi check for mature (pakat/ gharda) bhindi. You should discard them as they won't get cooked. They are generally big and difficult to cut. To verify further, try to snap it in two by bending it. If it doesn't snap then it is indeed mature and needs to be discarded.
3) Remove the dincha (top) of the bhindi as it won't cook.

Punjabi Bhindi Curry | Okra Stir Fry

Punjabi Bhindi Curry | Okra Stir Fry


Thursday, 3 April 2014

Punjabi Aalu Gobi Sabji | Aloo Gobhi Curry | Alu Gobi Adaraki | Potato Cauliflower Curry

Zini has finally started formal school!! Now she goes to school in a bus wearing uniform!! Today she even got homework!! Makes me realize that my little girl is growing big!! Thankfully she likes the school and has made a friend whom she was seen hugging today!! Touchwood..
So now I am back to having some free time. Hence here is the recipe of Punjabi Alu Gobi ki sabji that I made today. My hubby is a very fussy eater. There are very few vegetables that he likes to eat and thankfully Alu Gobi is one of them. It is one of Zini's favorite too!! As a result I make this curry every week!!
Why I like it? It's so easy to cut and clean and gets cooked in a jiffy. It is also flavorful, delicious, healthy and naturally vegan!! If you are averse to potatoes then you can replace it with peas or can altogether skip it. During my Hyderabad days, I was very thankful for Aalu Gobhi as it came in handy in morning rush hour!! So if you are in hurry but want to eat something tasty yet healthy, go for this simple curry..

Punjabi Alu gobi curry
Punjabi Alu Gobi curry

Ingredients:

Cauliflower (Phool Gobi) - 1 medium sized
2 Medium sized potatoes
finely cut ginger (Adrak) - 1/8 teaspoon
2 Tablespoon oil
1/4 teaspoon turmeric powder (haldi)
Salt to taste
1/4 teaspoon red chili powder (lal mirch powder)
2 teaspoon Coriander seeds powder (Dhania Powder)

Method:
1) Wash and cut Cauliflower in florets, remove stems. Soak in salted water to get rid of germs if any.
2) Peel and cut potatoes of almost the same size as the cut cauliflower florets.
3) In a thick bottomed Kadai (Wok), take oil and heat it. Add finely cut ginger to it, let it brown a little.
4) Now add the cauliflower (sans water) and potatoes to the wok.
5) Add salt and turmeric powder, mix well.
6) Cover and cook for around 15-20 minutes. Keep stirring in between, esp if you wok is not thick bottomed / non stick.
7) Once the cauliflower and potatos are about to get cooked (are about to get mushy), add red chili powder and Coriander powder. Mix well.
8) Cover and cook for 5 more minutes.

Serve with rotis..

Notes:

1) You can increase or decrease the amount of red chili powder as per your liking.
2) In case you don't have coriander powder, replace it with coriander - cumin powder or curry powder (garam masala) in reduce amount.
3) You can replace potatoes with peas, or totally skip it.

Punjabi Alu gobi curry
Punjabi Alu Gobi curry


Tuesday, 29 January 2013

Punjabi Chhole /Kaabuli Chane

My hubby is mad about them. Anytime you ask him what does he want to eat, he will say Chhole!!! No, he doesn't consider the fact that you can't make them instantly....And he is very particular about the colour of the Chhole!!!

In initial days of marriage i called up MIL and asked her the recipe of chole, she forgot to tell me one ingredient that is used for colour hence i used to produce Choles with different colour and he always used to drive me nuts saying "yeh colour kuch alag hai" :roll: Finally i called up MIL to complain about her Ladla and his fixation about the colour, it was then she enlightened me about the "secret" ingredient!!!

What is that secret ingredient you may ask...well, it is our plain,old, humble Tea water!!!!

So finally, i could make the perfectly coloured Chhole using tea water and of course they tasted great...

Once we had a friend visiting us and i made Chhole and he liked them very much, so he asked me the recipe...Before i could answer hubby chipped in by saying it's the "Tea" that makes all the difference!!! and you should add Tea to chhole to make them tasty!!! Now the friend too got all enthu at finding the secret ingredient and said he will ask his mom to put tea leaves in the Chhole!!!!

Finally i had to intervene to tell him that you don't add tea leaves but the tea water to chhole!!! Imagine, chhole with tea leaves in it!?!?!

So presenting the Chhole with a secret ingredient ;)

Chhole Puri
Ingredients:

3 Cups Chhole soaked overnight (If you want to make it for dinner than, you can soak them in the early morning :) )
3 medium sized Onions finely cut
3 medium sized tomatoes finely cut
2 teaspoon ginger garlic green chili paste
4 tablespoon oil
1 teaspoon garam masala
2 teaspoon Chhole masala
1/4 teaspoon red chili powder
1/4 teaspoon chaat masala
1/4 teaspoon Aamchur powder (Dry mango powder)
Salt to taste
2 teabags or 2 teaspoon tea leaves

Method:

1) If using tea leaves then, take water in a pan add tea leaves and boil them on high flame for 3 minutes

2) Once you see the water darkening, drain it using a Channi.

3) Add this water to chhole soaked overnight. If using tea bags then directly add bags to the chhole, add water, salt and pressure cook them till they are cooked.

Pressure cooked chhole
4) Meanwhile, in a mixer add onions and tomatoes and crush them to get a coarse paste, add a little water if needed. I use hand mixy to do this.

5) In a pan, take oil and add the onion tomato paste and green chili ginger garlic paste.

Onion Tomato paste before cooking
Onion Tomato paste before cooking[/caption]
6) Saute till oil separates on medium flame. May take upto 15-20 mins.

Onion Tomato paste after cooking
 7) Now, take the pressure cooked Chhole in a plate, mash them a little, and add red chili powder, garam masala, chaat masala, chhole masala and aamchur powder to the plate.

Masaala added to the pressure cooked chhole
8) Add this chhle-masala mixture to the pan (with onion tomato paste)

10) Mix everything nicely and mash chhole further. Cook on medium flame for 5 minutes or till you see oil separating.

After adding the masala wala chhole to the pan
11) Now add this mixture to the pressure cooked chhole, keep the consistency a little thinner than what you want as it will get thicker later on. Oh and don't forget to take out the tea bags if you used them :)

12) Cook on low flame covered for 20-30 minutes.

13) Garnish with finely cut onions and serve with Bhature/Puris/ Parathas/Kulcha.

I prefer to add finely cut onions and lemon juice/imli chuntey to it, but hubby prefers it with onions.

Notes:

1) No, i didn't forget to add turmeric to the list. If you want the dark colour for your chhole then don't add turmeric to it.

2) You can skip tea water, it's basically for colour.

3) If you don't have aamchur powder then you can use anaar daana powder or even more chaat masala in place of that. Aamchur powder is basically used for adding tangy taste.

4) Try adding imli chutney or tomato ketchup to chhole, my FIL showed this way of eating to me and i love my chhole this way :)

+techie ZM

Winter Special - Sarson ka Saag with Makki Roti


This is North India's favorite food during Winters. Made of Mustard greens, this saag is rich in vitamins and minerals and also calories (due to butter and ghee)..... Traditionally eaten with Makki ki roti, this saag is sure to bring food induced Nirvana to any Punjabi (except my hubby though, who is more of a gujarati than Punjabi ;))....And after Bollywood endorsing this dish big time, everybody in India is curious about it.

My in-laws won't mind having this for lunch and then for dinner and then for breakfast and if still something is left then for lunch again!!!!! Well, to their defense i must add that the dish is tasty, i too enjoy it (though not for every consecutive meal :))

Again i understand (though i am not very sure) that it is made differently in different households. I make it the way my MIL makes it, with a little time saving modification. So here is the recipe....

Sarson Saag with Makki Roti

Ingredients:

For Sarson Ka Saag
Mustard Greens (Sarson Leaves) - 2 big bunches
Spinach - 1 bunch (you can add Bathua leaves also, though i don't add it)
2 tablespoon of makki ka aata - Corn Meal (Different then regular corn flour used in soups)
5 Big Onions - Finely cut
2 Green chilies - Finely cut
10 garlic pods (yes 10!!) - Peeled and finely cut
1 inch ginger - peeled and finely cut
1 teaspoon garam masala
4 Tablespoon Oil
Salt to taste
3 tablespoon Butter or Ghee (I use fresh homemade white butter)

For Makki Roti

1 Cup Makki Aata - Corn meal (Different then regular corn flour used in soups)
salt to taste
water to knead the dough

Method:

1) Clean the Mustard greens.
How you do it is very important. 1st you take leaves along with tender stems. After that you have 2 options, either you throw away the bigger stems or you peel them and cut finely and use it. I go for the 2nd option as that way the taste improves, but it takes a hell lot of time to peel the stems. If you are strapped for time then you can go for option 1.

2) Clean the Spinach leaves. Mix them with Mustard greens and wash properly 4-5 times or till you feel they are clean.

3) Then after adding water to the leaves, pressure cook the leaves for 4-5 whistles on low flame. My MIL cooks it covered in a pan, but it takes 2-3 hours for the sarson leaves to get cooked. so i go for pressure cooking which is faster. I personally don't think it makes any difference to the taste.

4) Let it cool down and then grind together in a coarse paste in your mixer and transfer in a pan.

5) Cook it in the pan covered for 10-15 minutes.

6) Now add the 2 tablespoon of corn flour and salt in proportion of the paste and cook again for 20 minutes while stirring in between.

7) In a pan, take oil for tadka and heat it up, add finely cut onions, finely cut green chili, finely cut ginger and finely cut garlic to it. Add salt to the proportion of onions. Saute till the onions turn translucent. Add garam masala.

8) Add this tadka to the mustard green paste and mix thoroughly. Add 2 tablespoon butter or ghee.

9) Simmer it for 5 minutes and you are ready to serve the saag. While serving add a tablespoon of ghee or butter.

10) For makki roti, knead the dough by mixing makki aata, salt and water.

11) Now rolling Makki roti is a difficult tast. To get unbroken rotis, i use a wet kitchen towel and roll small makki rotis  on the towel (my neighbour and friend V taught me this trick and it works like a charm). To take the rotis off the towel take the towel in your palm and turn it over to put roti in your other palm.

Then on the hot tawa make rotis like regular rotis. Apply ghee or butter.

And Enjoy Makki ki roti with Sarson ka Saag....

+techie ZM 

Malai Kofta Curry


I have this childhood memory of going to the Collegian restaurant with my parents and nicely place the napkin on my lap acting like a grown up and ordering my own food and enjoying our dinner together...But what i remember most from those days is the Malai Kofta...Every time we went there, i would order Malai Koftas. But sadly the restaurant closed down and i could not find that amazing taste of Malai Koftas anywhere else even at the reopened Collegian...

But then i bought this book from Neeta Mehta and in that i found the recipe of Malai Kofta (or rather i bought the book because it has the recipe of Malai kofta :) oh and BTW of Jalebi also) and i made Malai Kofta following the recipe (well almost!!!) and we found it delicious!!!! But i was not completely satisfied, so i decided to make a few changes suggested by hubby and do things the way i do for the Shaahi Paneer recipe...And Viola, i found the perfect taste!!!!

My only problem with this recipe is that i have to stop myself and my family from "tasting" the gravy and kofta before the actual meal, and believe me it's very difficult to stop!!!!

So without further ado, here is the perfect Malai Kofta Recipe....

DSC_0070-2
Yummy Malai Kofta....


Ingredients:

For gravy

3 Onions peeled and cubed
3 tablespoons fresh cream
2 handfuls of cashews
1 small pinch of saffron strands soaked in warm water
1 teaspoon Garam Masala
1/4 teaspoon Red chili powder
1 big pinch of kasoori methi
1 teaspoon sugar
Salt to taste
2 tablespoon oil
1/4 cup milk

For Koftas

2 Boiled potatoes
100 gm paneer
1 brown bread (white will also do)
Salt to taste
1/2 teaspoon Garam masala
1/4 teaspoon Chili powder
Chaat Masala to taste
Oil for Frying Koftas

For Filling in Kofta

1 small onion, finely cut
5-6 Cashew finely cut
2-3 pinches of finely cut ginger
salt
2-3 pinches garam masala
15 Kishmish (raisin) (Optional)
chaat masala to taste
1 tablespoon oil

Method:

1) For making Gravy, in a mixy (and not in a hand blender, it doesn't give the required smooth texture) take onions, cream and cashew and create a smooth paste. If needed add a little milk.

2) For gravy, in a kadai add oil and then add the paste, stir continuously till the oil separates. Also soak Saffron strands in warm water.

3) Then add Salt, Garam masala, chili powder and sugar, saffron strands and kasoori methi. Mix well.

Gravy for Malai Kofta
4) Add the milk and a little water and mix well. Gravy is ready...

5) Now for the Koftas, in a big plate, mash the boiled potatoes, paneer and the bread nicely together and mix well.

6) To this add salt, garam masala, chaat masala and chili powder and mix well.

7) For the filling in the koftas take a kadai and add oil and the finely onion and ginger. Saute till it turns brown. Then add the finely cut cashew, salt, garam masala and chaat masala. mix well. your filling is ready.

8) Now make balls of kofta (using the potato, paneer mixture), then using your finger make a cavity in the center and fill the prepared filling and Kishmish and seal the ball. Flatten it like a tikki.

9) I made it like Tikki by shallow frying it on the tawa. You can deep fry them, but carefully while deep frying because, the koftas are so soft, they tend to break if handled roughly. And if you are planning to deep fry then it will be advisable to keep the kofta shape round rather then the disc like tikkis.

Kofta
Koftas....
 Or you can bake/grill the koftas as RM did for her kela koftas. I tried baking, and they were tasty but not very soft, so next time i grill them i will brush them with a little more oil, that should solve the problem.

10) When ready to serve, check the gravy, if it needs to be made thin then add little water to the gravy, mix well and simmer. Take it out in the serving bowl, add the koftas (carefully otherwise they may break). Mix and serve...

Goes well with the tandoori rotis, naan or parathas...Enjoy...

+techie ZM

Jalebi!!!


Jalebi is a dish that is loved across India!!! So, when i saw Jalebi's recipe in a newspaper long back, i thought it's so easy...Why doesn't anyone make it at home?!? Well, i tried it and came to know "Why"....

Though it's very quick to make, it's not as easy as it looks. So 1st time i tried it (4 years ago), in place of Jalebi, i got Boondi!!!! It tasted good but the shape was all messed up. So i gave up on Jalebi....

Recently again i came across it's recipe in a Neeta Mehta book that i have and thought of trying it again. And this time i could manage to make something in between Jalebi and Boondi, still shape was not perfect. But the taste was of authentic Jalebi!!!! Yipee......

I realized that here, consistency is the Key. The batter should not be too watery at the same time it should not be too thick.

Once you figure out the consistency, making Jalebi is Cakewalk!!! The consistency should be thicker than Dosa (It should be of dropping/ribbon  consistency)

And next time i made it, i could manage decent shape as well!!! Here is the pic!!!

Jalebi.....
As i said, the recipe is  from a Neeta Mehta cookbook, this will make a lot of Jalebis, if you are making for 2 people then please use half the quantity.

Ingredients:

For Jalebi:
Maida - 1 Cup
Besan - 1 Tablespoon
Soda - 1/4 teaspoon
Oil - 1/2 Tablespoon
Thick Curd - 1/2 Cup
Warm Water - 3/4 Cup (Based on the Maida you are using, the amount of water needed may vary)
Oil for Frying

For Sugar Syrup:
Sugar - 1+1/4 Cup
Water - 3/4 Cup
Saffron strands - 2 pinches (though the recipe said to use Orange-red colour, i used saffron)

Method:
1) In a mixing bowl, take Maida, Besan and Soda.

2) Add thick curd & oil. (I have realized that if you use 1/2 days old curd just out from the fridge then it gives better results).

3) Now comes the consistency part, so very carefully, add warm water to the mixing bowl.

4) Beat everything together and till you get the batter of dropping consistency (thicker than dosa batter)

5) Cover it and leave aside for 30-40 minutes (Don't skip this, it is important).

6) Heat oil in a kadai.

7) The book says that using a piping bag make circles (from outside to inside) in the hot oil.
Initially i used my Sev no sancho (Sev maker, Kitchen Press or whatever it is called) to drop jalebis..It gave me okay results.
Later i put the batter in an old hanky and made a hole in the center (to get a potli like thing) and it gave me correct shape.
Next time i am going to try the empty milk packet, where after washing the drying the milk packet, i will fill it with batter and will make a hole at the bottom to drop the jalebis in the oil. (Idea from Hubby's aunt)
Edited to add photo: These one's are made using empty milk packet and they came out perfect, so i am going to stick to them for Jalebi making :)
Jalebis (dropped using empty milk packet)
8) Fry the Jalebis in the oil till they are the heavenly golden coloured, like a jalebi should be :) take out on tissue paper.

9) Meanwhile make Sugar syrup. For that Mix water, sugar and saffron strands in a kadai and heat. we have to get the syrup of single string. For that after the 1st boil, keep the flame low and keep stirring for 5-7 minutes.

10) Let the syrup cool for a minute and then dip Jalebis in the syrup (Don't dip all of them together, do in the batch of 3-4 Jalebis at a time) and serve hot!!!
You can garnish it with saffron strands soaked in warm water, or serve with Rabdi or cream!!! We had it even with Vanilla ice cream :)

Notes:
1) Dip the Jalebis in the syrup only when you are ready to eat them.
2) Make the syrup only when you are ready to eat Jalebis as the syrup will become thick after some time (though you can heat it up again on low flame, but still it is good to make fresh syrup).

+techie ZM

Shahi Paneer with a (tomato) twist | Quick Paneer Curry | Curry in a hurry | Restaurant style Shahi Paneer


I learnt this one from my friend and neighbour P. And it was an immediate hit. Zini too loved it. And it is so easy and fast to make, i make it now to impress my guests ;)

Shahi Paneer.....


So let's get to the business...

Ingredients:

2 Big Tomatoes
Handfull of Kaju
2 Tablespoon Fresh (or otherwise ;)) cream
1 Medium sized onion
1 small capsicum
1 Teaspoon Ginger Garlic paste
Salt to taste
1/2 teaspoon Garam Masala
1/4 teaspoon Black pepper powder
1 pinch turmeric
4 Tablespoon oil.
100 Gm paneer
1/2 cup warm water
2 pinches of Kasoori Methi
Dhania patta and a green chilli for garnishing

Method:

1) In a mixer, make a smooth paste of kaju, Taomatoes and fresh cream. (Don't add water)

2) Cut the Onions and Capsicum in square shape.

Onion and Capsicum
Onions and Capsicum
 3) Take oil in a kadai and saute the capsicum and onion in it. Ensure that they remain crunchy.

Onions and capsicum Done
 Onions and capsicum Done
4) Once they are done, take out in a plate or bowl or anything. (leaving the oil behind).

5) Now, in the same kadai, add the ginger garlic paste. and saute it.

6) Add the paste of tomato, kaju and cream to the kadai.

7) Keep stirring the paste, till you see the oil separate (it is actually the ghee, that comes out of the cream :) )

8) Now, add the salt, garam masala, turmeric, kasoori methi and black pepper powder and mix well.

Oil seperated, Masala Added
9) Add half cup of warm water to the kadai and mix well.

10) Cut the paneer pieces in a triangular shape and add to the kadai.

After adding Paneer and water
11) Cook on a medium flame for 5 mins.

12) Add the sauted Capsicum and onion to the curry and it is ready!!!

Take out in a bowl and garnish with finely cut dhania patta and a slit green chilli.

Before Garnishing, almost done
Before Garnishing, almost done[/caption]
Serve it with tandoori roti, naan or parathas...

+techie ZM

Palak Paneer/ Aalu Palak

Paalak (Spinach) is not very popular otherwise, but transform it into this mouth water dish and suddenly the same old, boring paalak turns very attractive.... The best thing about this healthy curry is that it is a powerhouse of iron, vitamins and protein (if using paneer (cottage cheese) or tofu). And it is extremely flexible, lending itself to vegan version by accommodating tofu in place of paneer (cottage cheese) or paleo version by allowing use of potato in place of paneer.

This is my MIL's version of this curry with little time saving modifications from me. If you want to check out other authentic Indian & Punjabi recipes, check out the recipe Index. Enjoy....

Palak paneer / spinach curry with cottage cheese


Palak paneer / spinach curry with cottage cheese
Ingrediants:

Onions – 2 medium sized
Tomatoes – 2 big
Green chilly - 1
Ginger
Garlic
Palak (Spinach) – 250 gms
Paneer (Cottage Cheese)– 100 gms (For vegan version use tofu, for paleo version use boiled potatoes cut into pieces)
Red chilly powder
Salt
Garam masala/ curry powder

Method:

1) Blanch Palak by putting it in boiling water. Once cooled make paste of palak in mixer (i keep it coarse, you can make fine paste if you like). Don’t throw away the water, use it to make paste.

2) Make paste of Onions, tomatoes, green chilly, garlic and ginger in mixer. Add water if needed. I keep this paste also coarse, you can also make fine paste.

3) Heat oil in a pan, and sauté the onion, tomato, chilly, ginger, garlic paste in it, till the oil separates.

4) Once oil separates, add salt, a little red chilly powder and garam masala. (remember that we already have green chillies to make it spicy, if you don't want it too spicy then you can avoid red chilly completely)

5) add the palak paste to it, cook it for a minute.

6) Now add Paneer/Aalu

            you can either deep fry them

           Or you can shallow fry them on a greased tava.

           Or you can put them as it is by cutting into pieces (This is what i do, it's healthier & less time
           consuming :))

7) Mix well, add water if needed.

8) Cook for 10 mins, or till the extra water evaporates.

You can serve the curry with Fulkas, Tandoori Rotis, Parathas or Rice, use leftover curry to make Palak Paneer Puris :)

Palak paneer / spinach curry with cottage cheese


Palak Paneer
Palak Paneer[/caption]

+techie ZM

Nimbu Soda | Fresh Lime soda | Lakhoti Soda | Banta Soda | Shikanji

Do you remember those Nimbu soda available on streets during hot summers or on humid sweaty weather, where the bottle is sealed using a lakhoti (marble)?!?! It is also called Banta Soda in Northern India..

Here, i have tried to recreate that version without using aerated(soft) drink!!!

We don't store soft drinks at home. So i use the Meetha Soda (Soda Khar - powdered) that i have at home to make this refreshing drink!!! And this way of making it is so easy and you get to customize the taste to suit your palate!!

The inspiration is from my mom, she used to make home-made soda by mixing limbu na phool (Citric acid) and soda. And later in a science class i realized that Soda is basic in nature and Citric Acid is, well, acidic in nature. When they meet in the water, you see the (re)action in form of the bubbles!!! This exact trick is used in making Khaman also, where both the soda and citric acid are used.

Fresh Lime Soda / Limbu Soda
Ingredients:

1 Big Lemon

4 teaspoon sugar (you can make it less if you like it less sweet)

2 cups of cold water (you can keep temperature as per your liking)

1/4 teaspoon salt

1/4 teaspoon rock salt (Sanchal)

1/4 teaspoon Meetha Soda (Soda Khar)

2 pinches of Black pepper ground (optional)

few leaves of fresh mint-Pudina finely cut (Optional)

2 pinches of chaat masala (optional)

2 pinches of bhuna jeera powdered (optional)

2 ice cubes (optional)

Method:

1) In bowl take all the ingredients except Meetha soda and mix well (to make nimbu paani).

2) If you are don't like to have any solids in your drink then, keep aside the nimbu paani for 15 minutes (so that all the flavors seep in the drink) and then drain using a channi.if you don't mind the mint leaves and black pepper solids in your drink then don't drain.

3) Pour out in the glass at the time of serving and add meetha soda to it, mix for 2-3 seconds and enjoy your homemade Nimbu Soda!!!

Notes:

1) You can customize this drink to your choice. i.e my hubby doesn't like mint, black pepper and bhuna jeera in his drink. But i like everything except black pepper, especially fresh mint!! and my in laws love everything including black pepper!!! So 1st make nimbu paani/lemonade as per your taste and then add meetha soda to convert that into fresh lime soda customized to your taste buds.

2) If you have and want to use the drinking soda / sparkling water then skip mitha/powdered soda and water. Mix everything except soda in a tablespoon of water, use powdered sugar. Once everything mixes well, add sparkling water/drinking soda and enjoy immediately.

3) You can also use the Shikanji powder readily available. In that case skip every masala except sugar and mint.

4) In case you have drinking soda then skip water, soda powder and citric acid. In very little water mix all other ingredients and then at the end add the Drinking soda and mix and serve immediately...

Fresh Lime Soda / Limbu Soda


+techie ZM

Tandoori Roti (Without Tandoor) | Tandoori Roti on Tawa | Tandoori roti without Tandoor oven


Yes, yes your read it correct, the recipe is of Tandoori roti without any kind of Tandoor.

Once during her visit to us in Hyderabad, hubby's bua told me that she would make Tandoori rotis for us. I got worried and told her that we didn't have any kind of tandoor. She said she would manage, and manage she did!!!!

She actually made tandoori roti using my pressure cooker!!!! after learning the trick i tried making these rotis on Tava and they came out perfect, so i now use tava to make the tandoori roti!!! And every time i make Malai Kofta or Shaahi Paneer or Daal Makhni, i end up making these tandoori rotis.

Tandoori Roti without Tandoor

Tandoori Roti on tava
So let's get going....

Ingredients:

Wheat flour

Salt (Optional - i don't use it)

Water to knead the dough

Method:

1) Knead the dough of regular roti. Keep it a little sticky.

2) Heat a thoroughly scrubbed  tawa (or cooker) on high flame.

3) Roll oval shaped (just for effect, in any shape they will taste equally good :) ) rotis using as little flour as possible.

4) Wet your hands and brush the roti with water.

5) Now take roti in one hand and shift it to the other hand with little pressure. keep flipping between hands for 4-5 times.

6) Now carefully put the roti on tava and by applying little pressure everywhere stick it to the tawa. Sticking the roti is very important.

7) Now flip the tawa, so that roti is facing the flame.

Tandoori Roti facing the heat
8) Cook the roti properly and then flip the tawa to get it back to it's normal position.

9) Using a chimta (forceps) pick up the roti from the tawa, cook it directly on the flame on the other side also.

Apply Ghee/butter if you want to and have Garam Garam Tandoori rotis with gravy of your choice....

Notes:

1) To ensure that the roti sticks to the tawa, you have to ensure that the tawa is not greasy and the roti has water applied to it everywhere.
2) While making them in cooker, be careful as sticking the rotis in can be a little tricky part and you may even burn a finger or two.You can use cooker, if you want to make 2-3 rotis at a time, for single roti at a time, i would recommend using tawa.

Tandoori Roti at home

Tandoori roti in cooker

Tandoori roti on tawa

Tandoori Roti
Tandoori Roti with Malai Kofta...


+techie ZM

Winter Special - Gaajar Halwa


I remember my mom peeling truckloads of Gaajar , then grating them(sometimes with our help or sometimes all by herself) and then magically transform them into most amazing Gajar ka Halwa in a big big kadai!!!! And then all of us devouring that halwa, sometimes piping hot, sometimes cold.

There was always a steady supply of this halwa at home throughout the winters...I loved loved it big time....But the thing with me is that i never learnt to make the things that i loved when i was at mom's place. Only after shifting to a different city i realized that to enjoy my favorite foods i will have to learn to make them...And then started the phone calls to mom to learn  the recipes...This is one of those recipes....Very easy to make but time consuming...But worth all the time it takes...

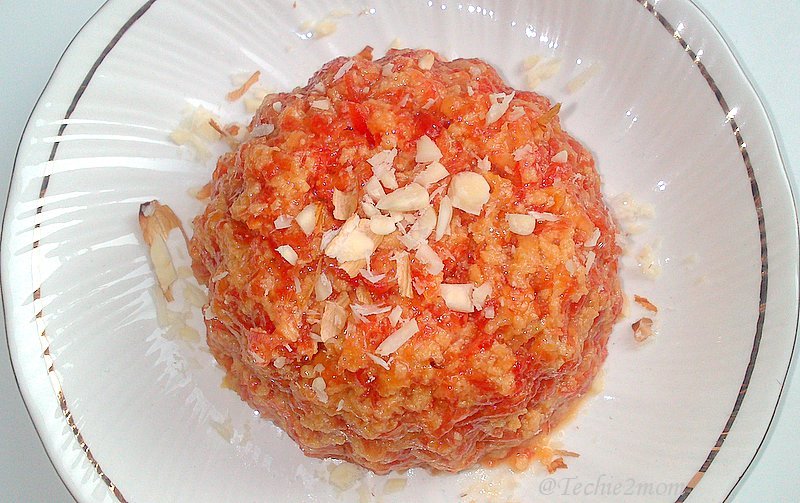
Gaajar Halwa

Ingredients:

Grated Carrots - 3 cups (remove the yellow core, only red part to be grated, for quick grating use food processor)
Full cream milk - 500 ml (approximately)
Ghee - 2 tablespoon
Fresh Cream - 3-4 tablespoon (I used the malai saved from the everyday milk)
Almonds - 5-6 finely cut or powdered  (optional)
Cashew - 5-6 finely cut or powdered  (optional)
Kishmish - 5-6 (optional)
Elaichi (Cardamom) powder - 1/8 teaspoon (optional)
Sugar - 3/4 cups (you can increase or decrease this amount as per your liking)

Method:
1) In a thick bottomed pan add ghee, once it turns liquid add the grated carrots and saute for 3-4 minutes.
2) Add milk to the pan, ensure that all the carrots should be submerged into milk.
3) Add fresh cream, almonds, cashew and kishmish and mix thoroughly.
4) Now, keep stirring and cooking on low flame till all the milk evaporates. May take upto 2 hours.
5) Now add sugar and mix well, cook on medium flame till the water from sugar evaporates.
6) Add Elaichi powder, mix well and Viola!!! The Halwa is ready!!!

Notes:

1) There are different methods of making this halwa.You can add khoya or condesed milk and cook carrots in pressure cooker or microwave. But for me nothing beats taste of this halwa, where the carrots are cooked in the milk directly....Heavenly!!!!
2) You can make it and store it in fridge for up to a week. I am sure you must be able to freeze it, though never tried it.
3) Even without sugar this tastes good. so if you want to avoid sugar you can do that by reducing the amount of sugar or by completely skipping it.

Sourdough Starter | Make your own Sourdough Starter at home | Bread without commercial yeast | Mother Starter

We are a nation of flatbread lovers.. We can't do without our rotis, Parathas, Chapatis and Puris.. But we also embrace new food trands...