Showing posts with label Indian cooking. Show all posts

Saturday, 4 January 2014

Khichdi Kadhi

This is my comfort food!! Quick to make, great in taste and very healthy!! When you are in hurry but want to eat something yummy, filling and comforting. Make khichdi kadhi and enjoy!!
Every region in India has different variants of the humble khichdi!! Came to know about it after I got married and MIL whipped up a different looking khichdi.
The one that I am sharing is Gujarati khichdi. You may find different variants of khichdi in different Gujarati homes too. Some people use chilke wali moong daal, some use yellow moong daal and some even use toor daal!! Tempering and spices used in khichdis also vary. Some do tadka using tel and some use ghee. Some of them add jeera and some other add methi. Some also add cloves and black pepper. Sometimes vegetable too are added to make it more healthy and complete!!
Wow!! One humble dish and so many variants!!
Same thing can be said about kadhi. Punjabi kadhi is different than Gujarati kadhi. And as I have seen different Gujarati homes make different kadhi.
At my home, kadhi is incomplete without green chili, ginger and garlic paste and a generous ghee ka tadka!! And we don't add sugar to our kadhi that many Gujarati families add. Though I like the one with sugar too, but I have a soft spot for the simple version of kadhi that my mom (and my grandmom and her mom and her grandmom) has been making :)


Khichdi Kadhi
Khichdi Kadhi

Ingredients for khichdi:

1 Cup Rice
1/2 cup yellow moong daal (split green gram)
2 cups of water (may vary according to your rice and daal)
1/2 teaspoon turmeric powder
1/4 teaspoon methi daana (Fenugreek seeds)
salt to taste
2 teaspoon ghee or oil for tadka
1 generous pinch of mustard seeds (rai/sarson)
a pinch of hing (Asafoetida)

Ingredients for kadhi:

2 cups thick curd
1 tablespoon besan
salt to taste
1/4 teaspoon turmeric powder (optional)
1 green chili, 1/2 cm long ginger peeled, 4 garlic cloves peeled - grounded to get a coarse paste (you can use readymade paste too)
2 teaspoon Ghee for tadka (You must use ghee, makes a lot of difference)
1 generous pinch of mustard seeds
a pinch of hing (Asofoetida)
1 twig kadi patta (mitho limdo)
a pinch of jeera

Method for making Khichdi:

1) Mix daal and rice. Wash and soak for 20 minutes. (If you are in hurry you can skip soaking).
2) Add salt, turmeric powder and methi daana to it.
3) Now in a kadai take ghee or oil for tadka. Add mustard seeds to it. Once they crackle, add hing to it.
4) Mix the tadka with the soaked dal rice. and pressure cook for 3 whistles (or whatever time it takes in your cooker to get the rice cooked).

That's it folks!! Khichdi is ready!!

Method for making Kadhi:

1) In a pan take curd and beat it. Add besan to it and beat . Add water to adjust it to a little thicker than sambar consistency. (We like it thick, you can dilute it if you prefer).
2) Add salt, turmeric and green chili ginger garlic paste. mix well.
3) Cook it on medium flame till the kadhi boils. Takes around 7-10 minutes.
Keep stirring continuously. If you stop stirring then the solid and liquid separates. This is called "Kadhi footi gayi" (Kadhi got broken)!! And footeli kadhi is not the done thing.
3) Now for tadka (tempering) take ghee in a small kadai. Plz take ghee, it's really important.
4) Add mustard seeds to it, once they crackle add jeera then hing and in the end kadi patta.
5) Mix it with kadhi and boil for one more time. Should take around 5 minutes. Don't forget to stir continuously.

And kadhi is ready!! Garnish with dhania patta if you have it around.

Khichdi Kadhi
Khichdi Kadhi

Serve khichdi with kadhi and a spoonfull of ghee. Papad and pickles too tastes great with it. At my home we have Khichdi kahdi with jeera meetha ni bhakhari, papad, methiyu athanu and kanda bataka nu shaak. 

Sending this to Dish it out - Light Dinner event hosted by Preetha and conceptualized by Vardhini..

This post is part of blogathon 2014

Tuesday, 29 January 2013

Winter Special - Sarson ka Saag with Makki Roti


This is North India's favorite food during Winters. Made of Mustard greens, this saag is rich in vitamins and minerals and also calories (due to butter and ghee)..... Traditionally eaten with Makki ki roti, this saag is sure to bring food induced Nirvana to any Punjabi (except my hubby though, who is more of a gujarati than Punjabi ;))....And after Bollywood endorsing this dish big time, everybody in India is curious about it.

My in-laws won't mind having this for lunch and then for dinner and then for breakfast and if still something is left then for lunch again!!!!! Well, to their defense i must add that the dish is tasty, i too enjoy it (though not for every consecutive meal :))

Again i understand (though i am not very sure) that it is made differently in different households. I make it the way my MIL makes it, with a little time saving modification. So here is the recipe....

Sarson Saag with Makki Roti

Ingredients:

For Sarson Ka Saag
Mustard Greens (Sarson Leaves) - 2 big bunches
Spinach - 1 bunch (you can add Bathua leaves also, though i don't add it)
2 tablespoon of makki ka aata - Corn Meal (Different then regular corn flour used in soups)
5 Big Onions - Finely cut
2 Green chilies - Finely cut
10 garlic pods (yes 10!!) - Peeled and finely cut
1 inch ginger - peeled and finely cut
1 teaspoon garam masala
4 Tablespoon Oil
Salt to taste
3 tablespoon Butter or Ghee (I use fresh homemade white butter)

For Makki Roti

1 Cup Makki Aata - Corn meal (Different then regular corn flour used in soups)
salt to taste
water to knead the dough

Method:

1) Clean the Mustard greens.
How you do it is very important. 1st you take leaves along with tender stems. After that you have 2 options, either you throw away the bigger stems or you peel them and cut finely and use it. I go for the 2nd option as that way the taste improves, but it takes a hell lot of time to peel the stems. If you are strapped for time then you can go for option 1.

2) Clean the Spinach leaves. Mix them with Mustard greens and wash properly 4-5 times or till you feel they are clean.

3) Then after adding water to the leaves, pressure cook the leaves for 4-5 whistles on low flame. My MIL cooks it covered in a pan, but it takes 2-3 hours for the sarson leaves to get cooked. so i go for pressure cooking which is faster. I personally don't think it makes any difference to the taste.

4) Let it cool down and then grind together in a coarse paste in your mixer and transfer in a pan.

5) Cook it in the pan covered for 10-15 minutes.

6) Now add the 2 tablespoon of corn flour and salt in proportion of the paste and cook again for 20 minutes while stirring in between.

7) In a pan, take oil for tadka and heat it up, add finely cut onions, finely cut green chili, finely cut ginger and finely cut garlic to it. Add salt to the proportion of onions. Saute till the onions turn translucent. Add garam masala.

8) Add this tadka to the mustard green paste and mix thoroughly. Add 2 tablespoon butter or ghee.

9) Simmer it for 5 minutes and you are ready to serve the saag. While serving add a tablespoon of ghee or butter.

10) For makki roti, knead the dough by mixing makki aata, salt and water.

11) Now rolling Makki roti is a difficult tast. To get unbroken rotis, i use a wet kitchen towel and roll small makki rotis  on the towel (my neighbour and friend V taught me this trick and it works like a charm). To take the rotis off the towel take the towel in your palm and turn it over to put roti in your other palm.

Then on the hot tawa make rotis like regular rotis. Apply ghee or butter.

And Enjoy Makki ki roti with Sarson ka Saag....

+techie ZM 

Malai Kofta Curry


I have this childhood memory of going to the Collegian restaurant with my parents and nicely place the napkin on my lap acting like a grown up and ordering my own food and enjoying our dinner together...But what i remember most from those days is the Malai Kofta...Every time we went there, i would order Malai Koftas. But sadly the restaurant closed down and i could not find that amazing taste of Malai Koftas anywhere else even at the reopened Collegian...

But then i bought this book from Neeta Mehta and in that i found the recipe of Malai Kofta (or rather i bought the book because it has the recipe of Malai kofta :) oh and BTW of Jalebi also) and i made Malai Kofta following the recipe (well almost!!!) and we found it delicious!!!! But i was not completely satisfied, so i decided to make a few changes suggested by hubby and do things the way i do for the Shaahi Paneer recipe...And Viola, i found the perfect taste!!!!

My only problem with this recipe is that i have to stop myself and my family from "tasting" the gravy and kofta before the actual meal, and believe me it's very difficult to stop!!!!

So without further ado, here is the perfect Malai Kofta Recipe....

DSC_0070-2
Yummy Malai Kofta....


Ingredients:

For gravy

3 Onions peeled and cubed
3 tablespoons fresh cream
2 handfuls of cashews
1 small pinch of saffron strands soaked in warm water
1 teaspoon Garam Masala
1/4 teaspoon Red chili powder
1 big pinch of kasoori methi
1 teaspoon sugar
Salt to taste
2 tablespoon oil
1/4 cup milk

For Koftas

2 Boiled potatoes
100 gm paneer
1 brown bread (white will also do)
Salt to taste
1/2 teaspoon Garam masala
1/4 teaspoon Chili powder
Chaat Masala to taste
Oil for Frying Koftas

For Filling in Kofta

1 small onion, finely cut
5-6 Cashew finely cut
2-3 pinches of finely cut ginger
salt
2-3 pinches garam masala
15 Kishmish (raisin) (Optional)
chaat masala to taste
1 tablespoon oil

Method:

1) For making Gravy, in a mixy (and not in a hand blender, it doesn't give the required smooth texture) take onions, cream and cashew and create a smooth paste. If needed add a little milk.

2) For gravy, in a kadai add oil and then add the paste, stir continuously till the oil separates. Also soak Saffron strands in warm water.

3) Then add Salt, Garam masala, chili powder and sugar, saffron strands and kasoori methi. Mix well.

Gravy for Malai Kofta
4) Add the milk and a little water and mix well. Gravy is ready...

5) Now for the Koftas, in a big plate, mash the boiled potatoes, paneer and the bread nicely together and mix well.

6) To this add salt, garam masala, chaat masala and chili powder and mix well.

7) For the filling in the koftas take a kadai and add oil and the finely onion and ginger. Saute till it turns brown. Then add the finely cut cashew, salt, garam masala and chaat masala. mix well. your filling is ready.

8) Now make balls of kofta (using the potato, paneer mixture), then using your finger make a cavity in the center and fill the prepared filling and Kishmish and seal the ball. Flatten it like a tikki.

9) I made it like Tikki by shallow frying it on the tawa. You can deep fry them, but carefully while deep frying because, the koftas are so soft, they tend to break if handled roughly. And if you are planning to deep fry then it will be advisable to keep the kofta shape round rather then the disc like tikkis.

Kofta
Koftas....
 Or you can bake/grill the koftas as RM did for her kela koftas. I tried baking, and they were tasty but not very soft, so next time i grill them i will brush them with a little more oil, that should solve the problem.

10) When ready to serve, check the gravy, if it needs to be made thin then add little water to the gravy, mix well and simmer. Take it out in the serving bowl, add the koftas (carefully otherwise they may break). Mix and serve...

Goes well with the tandoori rotis, naan or parathas...Enjoy...

+techie ZM

Tandoori Roti (Without Tandoor) | Tandoori Roti on Tawa | Tandoori roti without Tandoor oven


Yes, yes your read it correct, the recipe is of Tandoori roti without any kind of Tandoor.

Once during her visit to us in Hyderabad, hubby's bua told me that she would make Tandoori rotis for us. I got worried and told her that we didn't have any kind of tandoor. She said she would manage, and manage she did!!!!

She actually made tandoori roti using my pressure cooker!!!! after learning the trick i tried making these rotis on Tava and they came out perfect, so i now use tava to make the tandoori roti!!! And every time i make Malai Kofta or Shaahi Paneer or Daal Makhni, i end up making these tandoori rotis.

Tandoori Roti without Tandoor

Tandoori Roti on tava
So let's get going....

Ingredients:

Wheat flour

Salt (Optional - i don't use it)

Water to knead the dough

Method:

1) Knead the dough of regular roti. Keep it a little sticky.

2) Heat a thoroughly scrubbed  tawa (or cooker) on high flame.

3) Roll oval shaped (just for effect, in any shape they will taste equally good :) ) rotis using as little flour as possible.

4) Wet your hands and brush the roti with water.

5) Now take roti in one hand and shift it to the other hand with little pressure. keep flipping between hands for 4-5 times.

6) Now carefully put the roti on tava and by applying little pressure everywhere stick it to the tawa. Sticking the roti is very important.

7) Now flip the tawa, so that roti is facing the flame.

Tandoori Roti facing the heat
8) Cook the roti properly and then flip the tawa to get it back to it's normal position.

9) Using a chimta (forceps) pick up the roti from the tawa, cook it directly on the flame on the other side also.

Apply Ghee/butter if you want to and have Garam Garam Tandoori rotis with gravy of your choice....

Notes:

1) To ensure that the roti sticks to the tawa, you have to ensure that the tawa is not greasy and the roti has water applied to it everywhere.
2) While making them in cooker, be careful as sticking the rotis in can be a little tricky part and you may even burn a finger or two.You can use cooker, if you want to make 2-3 rotis at a time, for single roti at a time, i would recommend using tawa.

Tandoori Roti at home

Tandoori roti in cooker

Tandoori roti on tawa

Tandoori Roti
Tandoori Roti with Malai Kofta...


+techie ZM

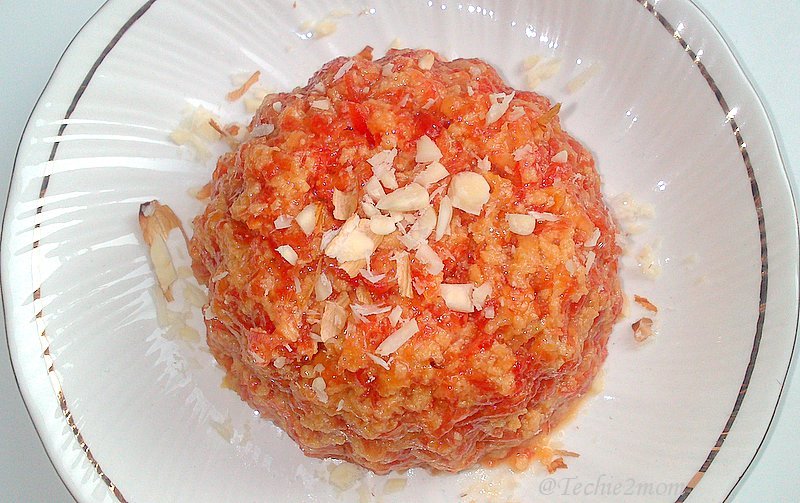
Winter Special - Gaajar Halwa


I remember my mom peeling truckloads of Gaajar , then grating them(sometimes with our help or sometimes all by herself) and then magically transform them into most amazing Gajar ka Halwa in a big big kadai!!!! And then all of us devouring that halwa, sometimes piping hot, sometimes cold.

There was always a steady supply of this halwa at home throughout the winters...I loved loved it big time....But the thing with me is that i never learnt to make the things that i loved when i was at mom's place. Only after shifting to a different city i realized that to enjoy my favorite foods i will have to learn to make them...And then started the phone calls to mom to learn  the recipes...This is one of those recipes....Very easy to make but time consuming...But worth all the time it takes...

Gaajar Halwa

Ingredients:

Grated Carrots - 3 cups (remove the yellow core, only red part to be grated, for quick grating use food processor)
Full cream milk - 500 ml (approximately)
Ghee - 2 tablespoon
Fresh Cream - 3-4 tablespoon (I used the malai saved from the everyday milk)
Almonds - 5-6 finely cut or powdered  (optional)
Cashew - 5-6 finely cut or powdered  (optional)
Kishmish - 5-6 (optional)
Elaichi (Cardamom) powder - 1/8 teaspoon (optional)
Sugar - 3/4 cups (you can increase or decrease this amount as per your liking)

Method:
1) In a thick bottomed pan add ghee, once it turns liquid add the grated carrots and saute for 3-4 minutes.
2) Add milk to the pan, ensure that all the carrots should be submerged into milk.
3) Add fresh cream, almonds, cashew and kishmish and mix thoroughly.
4) Now, keep stirring and cooking on low flame till all the milk evaporates. May take upto 2 hours.
5) Now add sugar and mix well, cook on medium flame till the water from sugar evaporates.
6) Add Elaichi powder, mix well and Viola!!! The Halwa is ready!!!

Notes:

1) There are different methods of making this halwa.You can add khoya or condesed milk and cook carrots in pressure cooker or microwave. But for me nothing beats taste of this halwa, where the carrots are cooked in the milk directly....Heavenly!!!!
2) You can make it and store it in fridge for up to a week. I am sure you must be able to freeze it, though never tried it.
3) Even without sugar this tastes good. so if you want to avoid sugar you can do that by reducing the amount of sugar or by completely skipping it.

Thursday, 24 January 2013

Handvo | Haandvo | Indian savory cake....

Haandvo is my all time favorite. After mom would declare that she is making haandvo, i would keep hovering around kitchen, till the Haandvo would be done and i could lay my hand on this crispy, cruncy outside and the soft, soft and yummy, yummy inside delicacy!!!
The best thing about it is that apart from being amazingly tasty, it is also healthy and complete food with cereal, pulses and veggies, food can't get better than this!!!
All my neighbours (at Hyderabad and Noida) who tasted this at my home, loved it. My front door neighbour P learnt to make it from me and now makes her own Haandvo and gets Haandva no lot grinded!!
My mom makes it in 2 ways, one is by baking and another is by making it in a pan. As my mom doesn't own oven, she uses the special "Haandva no dabbo". It's basically like a gas oven, where at the bottom you have a tray filled with sand, then on that you keep the actual utensil with food item inside. This way you got slow and uniform cooking for your Haandvo.  (You can even bake cakes in this!!)
I didn't learn to cook my favorite foods at my mom's place, only when i shifted to hyderabad, i realized that in order to enjoy my favorites i will have to learn to cook them. Haandvo is one those things...
I make Haandvo in a Pan, this kind of haandvo is also known as "Dangeli". You can also bake it in the oven.
And let me warn you, this is very addictive, once you make this, you will always make this :)

Haandvo - made in a pan
Ingredients:

Haandva No Lot - 1 Cup - This is available readymade in Gujarat, But if you are not in Gujarat then get
            yours by mixing
           3 Cups of rice (i used boiled rice),
           1/4 cup of Toor Daal (arahar daal/split pigean pea),
           1/4 cup of Chilkewali mungdaal (Split green gram)
           1/4 cup Chana daal (Split bengal gram)
           1/4 cup Urad Daal (Split black gram)
            generally you mix this well and get it coarsely grinded (like Semolina) by local flour mill to get the
            Hadva no lot. You can store this powder in an air tight container for months. But if you are not in a
            mood to visit local chakkiwala then you can soak all of the mentioned stuff together for 3-4 hours
            and grind to a coarse paste and add 1 teaspoon of Besan. This is my grandmom's secret ratio for
            making it softer inside and crispier outside...
Curd - 1 Tablespoon
Green chili paste- 1/2 teaspoon
Ginger paste - 1/2 teaspoon
Turmeric powder - 1/2 teaspoon
Asafoetida - 1 pinch
Salt to taste
Baking soda - 2-3 pinches (If making in the pan, not needed. If baking in the oven then use this)
1 small Lauki/Doodhi/Bottle Gourd (around 300 gms) - washed, peeled and grated
You can also add sugar, but i don't , neither does my mom or grandmom...

For Tadka (Tempering)
Oil - 4 Tablespoon
Mustard seeds/ Rai/Sarson - 3 teaspoon
Sesame seeds/ Til - 3 teaspoon
Ajawain/carom seeds - 3 teaspoon
Asafoetida - 1 pinch


Method:

1) Take the Haandva no lot in a bowl, add curd and water. If using the home made wet paste, then also add 1 teaspoon of Besan (Bengal gram flour). Mix well and keep in a warm place for fermentation for 6-7 hours. (In winters i keep it in a pre-heated oven, in summer keeping in a room works just fine)
2) Once it is fermented, add green chili, ginger, salt, turmeric powder, hing and grated bottle gourd. Mix well. Add water if needed, but remember Bottle gourd will also release water, so careful with it. Batter Should be of the consistency of Idli.
3) In a Non-stick pan on low flame, take 3 tablespoon oil in it.
4) Add mustard seeds to it. Once they crackle, add Sesame seeds, carom seeds and Hing.
5) Now, add your Hadvo batter to the pan. Cover it and let it cook on medium flame for 20 minutes or till the bottom is crispy and golden brown in colour. though keep in mind that for different types of pan time may vary.
6) After this, flip the handvo and drizzle 1 tablespoon of oil on the edges.
7) Cook covered for another 15 minutes.

Take it out and enjoy with green Chutney or tomato ketchup!!!

This recipe goes to 1 year blogoversary event of Pallavi's blog.....

Notes:

1) In place of making a single cake, you can make small cakes in smaller kadais (Pans). This way you can eliminate the need of non-stick pan.
Handvo in a Kadai- Do Tadka (Steps 3 & 4)
Haandvo in Kadai - Add the batter after Tadka (Step 5)

Haandvo in Kadai - Flip after one side is cooked (step 6)
2) You can also add other vegetables (like grated Onions, finely Methi, coarsely crushed peas/corn or grated carrots) in Haandvo, in that case reduce the amount of lauki..
3) You can also bake Handvo in oven. For that, add baking soda to the batter and pour it in a (greased and dusted with flour) baking tin. then proceed to the tadka as mentioned in steps 3 & 4. Pour this tadka on the top of batter in the baking tin. Bake in a pre-heated oven. You can get creative with this and bake it like small cup cakes or in different moulds to get fun shapes.

Sending this to Priya's May 2013 edition of Healthy me and Healthy Us event hosted by Jayanthi


Wednesday, 23 January 2013

Aalu Methi | Potato Fenugreek Curry - Simple yet yummy!!!

Now, this veggie is pretty common in Northern India, but practically unheard of in rest of India!!! I had never heard of or tasted, Aalu Methi (AKA Potato Fenugreek) till I got married and my MIL whipped up this simple but tasty sabzi one day!!!
The thing about Aalu methi is that, though it is predominantly made in northern states, it has a universal appeal...
Prove, you may ask...So let me tell you, I am a Gujarati, but when I had it first time, I really liked it!!! Ditto for my brother. Also my colleagues in Hyderabad, who were from different states (Andhra Pradesh, Maharashtra, Kerala and Tamil Nadu) enjoyed Aalu methi, whenever I carried it for  lunch!!! Simple lunch of Aalu Methi, Curd and Roti can be very fulfilling and of course it is very healthy...Give it a try...


Ingredients:
(Enough for lunch for 2 people)
4 Big Potatoes
2 cups of Methi (Fenugreek) cleaned, wahsed and chopped
2 Tablespoon oil (you can increase/decrease oil as per your liking)
Salt to taste
3 pinches black pepper powder
1 tablespoon Dhania-Jeera powder (Coriander seeds powder)


Method:
1) Separate methi leaves from the stem. You can include tender stems, but discard harder, more mature stems.
This is how you separate leaves from harder stems

2) Now cut the leaves.
Cut the leaves
3) Wash methi in enough water for 4-5 times, or till you see no dirt in water. This should be around 4 Cups of methi leaves.
4) Peel and cut potatoes in big chunks.
5) In a thick bottomed pan, add oil and heat it, then add potatoes and salt. Mix and cook covered on low flame for 5 minutes.
6) Now add cleaned and washed methi leaves, mix well and cover.
Mix with potatoes and cook covered
7) Cook till potatoes are tender, then add Chili powder, black pepper powder and dhania-jeera powder. Mix well. Keep stirring for about 2-3 minutes.

And you are ready to serve Aalu Methi!!!

Notes:
1) You can increase or decrease the amount of Methi as per your liking.
2) My MIL uses Dhania powder only, but I add Dhania Jeera powder because i normally store it. You can use any of these.


Aalu Methi | Potato Fenugreek


Aalu Methi | Potato Fenugreek
Aalu Methi | Potato Fenugreek 

Sourdough Starter | Make your own Sourdough Starter at home | Bread without commercial yeast | Mother Starter

We are a nation of flatbread lovers.. We can't do without our rotis, Parathas, Chapatis and Puris.. But we also embrace new food trands...